HOT off the
Press:
|
|
||
Get Nailed! You don't have to make weekly trips to a
manicurist to have great looking nails. You can get
started on the road to healthy, beautiful nails right at
home.
Now that you have all your arsenal of nail products handy, treat your nails to a mini spa. It's easier than it sounds. 1.Clean - First step is to clean your nails thoroughly. Remove all traces of nail polish on your nails and soak hands in a bowl of lukewarm water to soften the cuticle. Use a softly bristled nailbrush to clean any dirt from underneath the nails. Next, push back your cuticles. Wrap the tip of an orange stick with cotton. Moisten the tip slightly so the cotton adheres better, but don't use nail polish remover because it'll dry out your cuticles, and gently push cuticles back toward the nail bed. Unless you have a hangnail, don't attempt to cut your cuticles. If you do, make sure your hands are damp since cutting dry skin can lead to infections. 2. File - Now it's time to shape your nails. File in one direction only (a back and forth action can lead to tears). Don't file deep into corners of the nail bed since this weakens the nail. 3. Moisturize - At this point, be generous with cuticle and hand cream. Good choices are products with alpha hydroxy acids which help keep cuticles in check and diminish fine lines and wrinkles. If your hands, nails and cuticles are seriously dried and ragged looking, consider giving yourself an overnight deep conditioning treatment by slathering on a rich hand cream and covering your hands with white cotton gloves (available at beauty supply stores). In the morning when you take them off, you'll think you have new hands! 4. Polish - Once you've cleaned, shaped and moisturized your hands, remove any residue in the nail area with a bit of polish remover. Now is when you need a little drying action because any residual oils will prevent nail polish from adhering properly. Apply a base coat to the nails to protect and prevent them from turning yellow. On top of the base coat, apply two coats of polish. Clean any goofs with the tip of an orange stick (no cotton on the end) dipped in polish remover. Finish with a top coat to protect the color from chipping and add shine. If you're too busy to treat your nails,
consider giving your nails their mini spa while you're in
the shower. Keep your nail brush and diamond stick (the
orange sticks will rot) in the stall. Clean your nails
with your nail brush. Then, after you shampoo, take
advantage of your soft cuticles to push them back. Apply
cuticle cream when you've toweled off. Voilà! |
|||
A few more nail tips:
|
|||
|
|||

 by Gabby
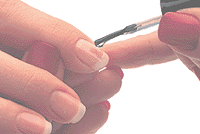 Nail polish remover
